
Mobikul Mobile App Builder for Magento 2 is a native app that can do all the basic Magento 2 tasks on your Android and iOS-based smartphones.
The app’s features are very much similar to your normal Magento. We have replicated all the features and functionality of the basic Magento 2 (Adobe Commerce Cloud). Moreover, your buyers will not have to bother about complex functionality because they can find things at their fingertips.
So, this is a readymade app that can be used by the store owner to increase their sales. With Magento 2 admin app they can access it from anywhere and anytime. Further, this technique can help a lot to increase the sales of the store.
The mobile application is contributing a tremendous role in creating a competitive advantage for your e-commerce store. It can help you to create a competitive environment for your competitors.
The native mobile app for the Magento 2 store must have all the essential features and functionalities and it should work perfectly according to your business needs and strategy.
Also, you need to take care of the technology that is used to create the mobile application so that you do not face any performance issues.
Mobikul does this work for you so that you can engage your customers over the mobile platform. The mobile platform has a huge role to engage your customers in your mobile store.
Mobikul Mobile App supports the feature Push Notification which is an essential feature of the mobile application. It helps to increase the customers’ engagement with the mobile store.
Check the video of the configuration part for the mobile app –
Check the Android mobile app overview in the video mentioned below –
Check the iOS mobile app overview in the video mentioned below –
Features
- All Product Types Supported
- Simple product
- Grouped product
- Bundled product
- Configurable product
- Virtual product
- Downloadable product
- In Addition to the above products, the app supports AR Products also.
Note - Here for iOS, the AR products are supported in the application as well as the Safari web browser.
- Interactive banner.
- Featured Product carousel.
- New product carousel.
- Hot deals in Magento 2.
- Provides the customers with layered navigation for optimized search.
- Informative and interactive shopping app with a fast and intuitive response.
- Supports default Magento 2 shipping methods.
- Supports ordering via phone, cash on delivery, money order, and personal cheque as payment methods.
- Well configured and easy to use at the admin end.
- The app supports Machine Learning to search for the product in a smarter way.
- The app has support for AI-based features like - AR Product Visualisation.
- The app also gives support to the AI feature - Size Calculation (only iOS).
- A fully native application built on Kotlin and Swift.
- The app supports GDPR to protect and control the data of the app user.
- Product Search via Barcode Scanning. (paid)
- The admin can manage the Home Layout Configuration dynamically like app theme color, app icon, select launcher icon type, splash screen image, home page layout (featured category and banner view), and categories view.
- The admin can also add the walkthrough for making the application look more fascinating.
Some Technical Aspects
- Time-critical services like push notifications, and alerts.
- Easy ‘sharing of products through various platforms like WhatsApp, FaceBook, Twitter, etc.
- Ease of use with ‘attractive and convenient UX’.
- Application frameworks or Operating systems, which it supports are ‘Android and Apple platforms’.
- Provision of ‘synced carts or cross-platform carts’ to bestow a seamless experience to browse on one platform and purchase from another. Along with it provides ease to shoppers as stored customer data doesn’t have to enter again, like delivery address and billing details, etc.
- Supports multiple trustworthy Magento 2 payment methods like Paypal, MangoPay, Stripe, WePay, Credit Cards, Cash on Delivery, etc.
- Providing layered navigation for filtering the products on various attributes.
- Interactive frontend panel for the stores.
- An additional feature provides multiple store views in which the store can be customized to view in different languages.
Admin Configuration
The admin can manage the Mobikul app from the backend in just a few simple sets of steps. The app configuration is done by the app owner as per business requirements.
The admin can amend the app as per the business requirement from Mobikul Configuration for this go to Stores > Configuration > Mobikul

I-Mobikul Basic Configuration
It includes the basic configuration regarding Mobikul’s initial requirement. Whereas, the admin can fill in details related to the app.
Navigation- Stores > Settings > Configuration > Webkul > Mobikul.
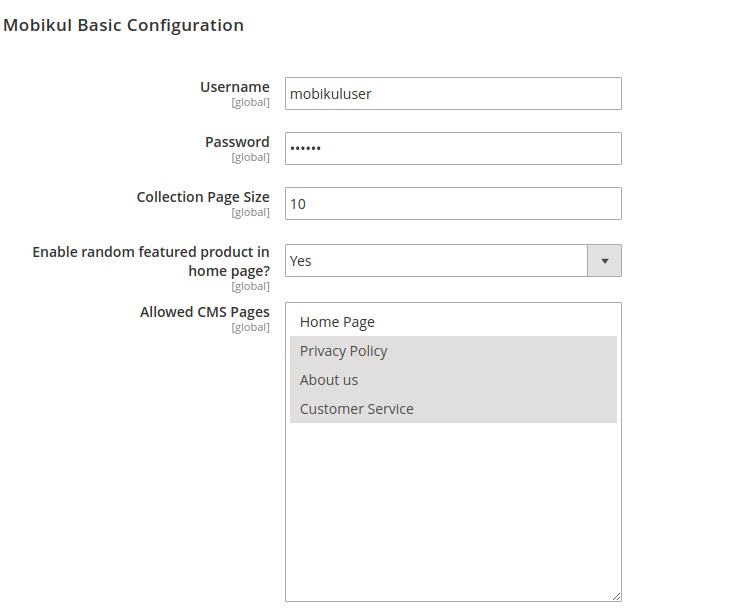
- Username - The admin needs to provide the username for the Mobikul. This is used for connecting to the respective server. The username is required to be mentioned in the code end as well.
- Password – Here you will provide the password for the Mobikul. This will be used with the above username for connecting to the server. The password is required to be mentioned in the code end as well.
- Collection Page Size - As the label name of the field is self-explainable. Here you need to set the number of products that you want to display on the collection page of your Mobikul application at a time.
- Enable random featured products on the home page. – If the field is set to “Yes” then, the featured image displayed on your Mobikul application will be taken on a random basis.
Note - If the field is set to “No” then, the admin needs to enable “Is featured for Mobikul?” on the product page.
So, for enabling any product to get in the featured product display on the application homepage you need to navigate through the following path at your admin panel.
Navigation- Products > Catalog > Add Product / Edit
- Allowed CMS Pages- The admin can select the CMS pages that they wish to display in the frontend.
II-FCM Push Notification Parameter
If an admin needs to setup push notification feature for your Mobikul mobile application then you must require this section’s fields to be set up.
So, please refer to our blog for learning more about:
- Sending notification through your app (via Firebase console).
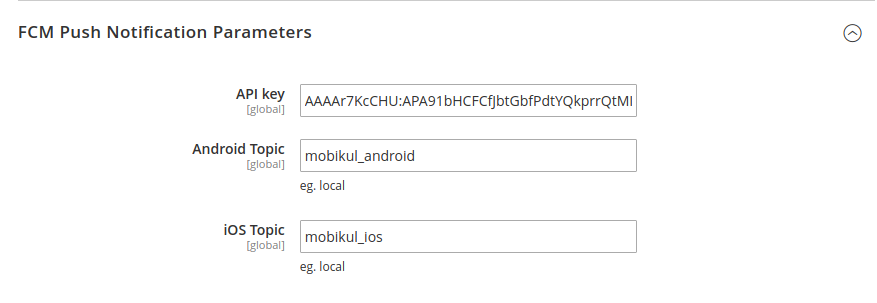
- API key: Admin needs to provide the Server API key which you will get after the firebase console registration.
- Android Topic: This will be used in sending the notification on a group basis on Android devices.
The topic name which you will provide in this field will be the name of the group. This will include all the mobile devices which have installed your application.
- iOS Topic: This will be used in sending the notification on a group basis on iOS devices.
Meanwhile, the topic name which you will provide in this field will be the name of the group. This will include all the mobile devices which have installed your application.
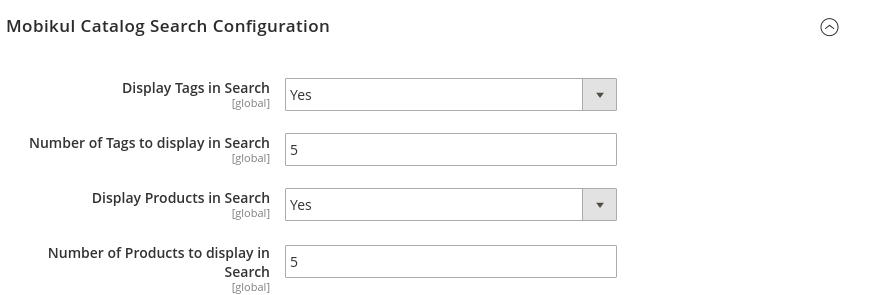
III-Mobikul Catalog Search Configuration
Admin can also configure your Mobikul’s mobile application SEARCH. You can configure your applications’ search on the basis of products and tags.
- Display Tags in Search: If you want you can display the tags in your Mobikul application’s search result.
- Number of Tags to display in Search: Here you will set the limit on the number of tags that will be displayed in the search result.
- Display products in Search: If you want you can display the products in your Mobikul application’s search result.
- Number of Products to display in Search: Here you will set the limit on the number of products that will be displayed in the search result.
IV-Application Download from Website
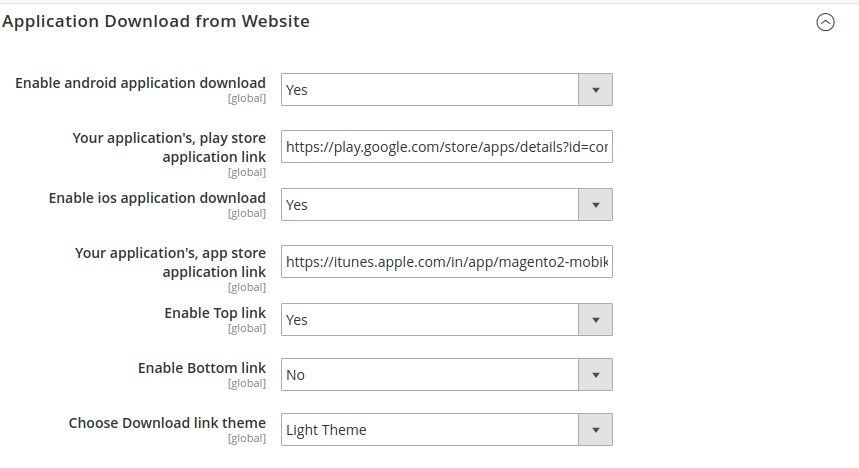
Here, the admin will enter the details as-
- Enable Android application download - The admin can set it Yes make the Android app link visible on the website.
- Your application’s, play store application link - The admin can specify the link of the play store.
- Enable ios application download - The admin can set it to Yes to make the iOS app link visible on the website.
- Your application’s, app store application link - The admin can specify the link of the app store.
- Enable Top link - This will make the app links visible on the website at the top.
- Enable Bottom link - This will make the app links visible on the website at the bottom.
- Choose Download link theme - The link of the apps will be visible on the lighter or darker theme.
V-Mobikul API Cache Settings
This section is meant for Cache maintenance for any action taken on the mobile app.
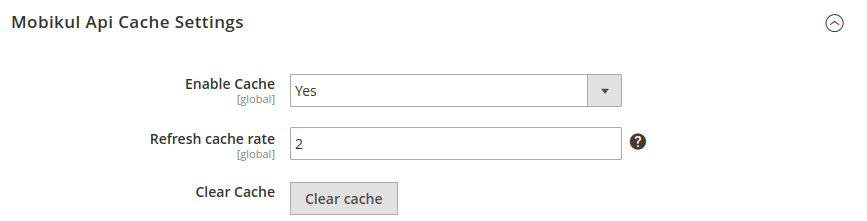
- Enable Cache– This is enabled to save the API cache data by setting it to Yes.
- Refresh cache rate– This will be the rate of hits after which the cache data will be cleared and refreshed.
- Clear Cache- This clears the cache data of API on clicking the button.
Home Page Configurator
The admin can manage the sorting of the category carousels present in the mobile app. For this, the admin will navigate to Mobikul > Manage App Creator. Then the admin can change the position by easily dragging the category and drop it to the desired position.

Order Label
The admin can also check that the order placed by the customer from the web end or mobile app. For this, the admin will navigate to Sales > Orders. After that, in the list of orders, an attribute named Order Place Point will be present that will show the order label.
For the reference an image is shown below:

Furthermore, check the Admin End’s Configuration to know more about the configuration setup.
AR Product Configuration
This product type will allow eCommerce customers to try products in 3D visualization with the help of the mobile application. The products are the simple product and configurable product type with Mobikul Configuration attached to it for AR-Product type.

Here the admin can enter the details of the product as in default Magento. However, as specified above the admin needs to enter details in Mobikul Configuration-
- AR-Model Type - The admin can select the 3D model option to view the 3D image of the product. This option will enable two fields-
-
- AR Model File For Android - In this field, the admin needs to enter the .sfb file which will contain a 3D image of the product.
- AR Model File For iOS - Here the admin needs to enter the 3D image of the product in the form of the .usdz file for the iOS device.
- Texture Image - Here, the admin needs to enter the background of the 3D image.
If the admin selects 2D for AR Model Type then the following options will appear:
- AR 2-D Model File - Here the admin needs to select the .png file type image for the 2-D model.

To get more information about AR product backend management you can click here.
Frontend Of Mobikul Mobile App Builder
Splash
The launching screen of the app is can be amended from the code end will appear to the users as they open up the app. Thus, helping the app owner to introduce the app or organization in a better way.

Homepage
The homepage of the app is having multiple sections to divide it into usable sections. The
- Category carousel (Featured Category) – It is situated on the top of the homepage where the customer can find a product according to the categories.
Thus, on clicking on the particular category the user will go to the category collection page.
- Featured Products- These Products are an exclusive collection of stores meant to be highlighted. So, they appear as per the settings done by the admin in the backend.

- New Products - It beautifully displays all the new products added to the store which can be purchased by the customer.

- Other Carousel Sections - Appart from the above section multiple carousels can be added by the app owner for the user. Thus, the app owner can configure the backend for the same.
They can be of either Product type or Image Type. So, for better understanding, we have the following sections-
-
- Hot deals
- Trending now
- Best Offers
- Fashion accessories
- Daily Deals
- Offers For You (Banner)


- Recently Viewed Products- The products which the user has viewed in the near past will be displayed in this section.
Thus, allowing a higher rate of conversion by providing a repeated view of the product.

Notifications
The app user can get informed about upcoming offers, schemes, order changes, and Abandoned cart via notification features. These Firebase Push Notification can contain any information from the above-mentioned topics.
Thus, helping the customer to execute effective shopping via the app. However, these notifications can be managed by the app user in the ‘Setting’ which we will discuss later.
So, the notification is linked with the order, product, category or cart which will open on clicking them.

Search
On clicking the search icon the app user can save themselves from scrolling effort. Further, this can be done in the following ways-
1-Search Via Term- The search feature operates in 3 ways- Like, Full Text, and Combine.
- ‘Like’ finds the similarity between the keywords matching with product titles,
- ‘Full Text’ exactly matches the keyword with the titles and
- ‘Combine’ is a mix of both.

Thus, allowing the customer to look for the desired product easily.
2-Make An Advanced Search-
The app user can take help of this feature to allow them to look for the product on the basis of-
- Product Name
- SKU
- Description
- Short Description
- Price Range.


Thus, this feature can save a lot of time of customer as it optimizes the search process in the best way.
3- Search Via Image- Machine Learning-
This feature will allow the customer to look for the image via image scanning. The app uses Google Firebase’s ML kit- a ready to use API. The app will save the search time via two ways-
- Text Detection – Here the app user can search the product by allowing the scanning of the text in on an object. Currently, the text detection works for the English language only.
- Product (Object) Detection – In this case, the app user can search the product via the real-time object. That is the app user can scan the product in reality which will open up the list of linked products.

Navigation Drawer
The navigation drawer has multiple options for the app user to use.
- Sign in/ Signup option
- Categories
- Website
- Language
- Currency
- Settings
- Privacy Policy
- About Us
- Customer Service
- Compare Products
- Orders and Returns
- Contact us
- App Version.


Sign In/ Sign Up
The customer can sign in and sign up for his accounts through the app. So, the Sign In/ Registration page can give the customer the options as-
- Sign in with the Email address
- Create An Account
- Options For Social Login(*paid)

Sign Up- Create An Account
The customer can register the application by filling the registration form. Thus, the app user can fill in the basic details to become a customer.

Sign in

Sign-in Via Social Login
The login can take place with the help of social media, to allow the customer to quickly login to the app. Hence, this will save the customer from remembering any sort of extra login details.
Caution - However, this is a Paid Feature. So, if you want this feature in the Mobikul Mobile Application then it will be done through customization.
To know more details refer here - Sign-in via Social Accounts.
Thus, once Logged in the customer will be able to view an additional section that is - ‘Account‘. This section will be having the personal detail of customer which we discuss later.

Categories
The feature permits to display all the products of the store, with their assigned and associated sub-categories and Parent category in the mobile application too.
Categories View
On clicking on a particular category the app user will be taken to a section where the list of sub-categories and product collection (only 3 products will be displayed) will be visible.
Thus, on clicking, a particular sub-category the user will be directed to the collection page.


Sort - The app user can sort the order of the product appearing on the collection page to easily view the desired options. So, the app user can click on Sort which opens a list of options to re-order the products.

Filter - This option is meant to attract customer by optimizing the search process wherein the app user could filter out non-desirable products.
Thus, the customer can click on the filter button and select the attributes of desirable products.

Product View
The Page will display the details related to the products which the app user can scan through. Thus, the page has the following details-
- Add your Review – Post purchase the app user can review the product by entering the rating, summary of the review and complete review-comment of the product.

- Add to Wishlist - The app user can click on ‘Wishlist button‘ to add the product to the wishlist.
- Compare- The app user can click on the Compare button to add the product to the comparison list.
- Share Product option- The app user can even share the product on social media by clicking on the share button.
- Edit quantity- The app user can append the quantity to purchase of the product from here.
- Add to Cart- The app user can click on the Add To Cart button to add the product to the cart for checkout.
- Buy Now- The customer can click on Buy Now Button in order to directly move to the checkout.
- Choose Options- If the product has multiple options associated with it app user can select them and add the product to the cart.
- Description/details of the product- The product complete details are also mentioned in this page for the app user to refer before purchase.
- Reviews attached to products along with the ratings


List/Grid View-
The customer can set the view of the product according to needs. They can see the product as a grid view or list view.


Account
The account section will save the customer’s personal data, in multiple sub-sections. This section as mentioned above will only be displayed to logged in user.

Dashboard
The dashboard will show the recent activities of the customer in 3 sections viz. My Address, My Order, and My Review.
- Recent Orders- This section encompasses the information about the customer’s recent orders with details like, Order ID, Name of the product, Total Amount, Status of The Order, and a ‘Details’ button through which other details of orders are displayed.

Thus, the app user can click on any corresponding order and get the details of the of complete order.


- Address- This contains the information about the Default Billing Address, Default Shipping Address, and Manage Other Addresses.
The app user can click on any address to edit the details on the address.


Here the app user can click on Manage Other Addresses to change the details of other address.

- Review - In this section, the Review which is submitted by the customer on various products are visible here.
Thus, the app user can click on View All Product Reviews to view the list of complete reviews given by the customer.


Wishlist
It will contain the products added by customers which they want to purchase in the near future. This section will display a few of the product details in the form of a thumbnail.
Thus, allowing the customer to view the details and add the product to cart. The customer can even append the quantity of product from here or remove the product from wishlist.

Order
The app gives its user an easy way to view the orders from this section also. Thus, allowing a quick way to access orders.
The customer for this section examine the details of the order and perform the action on the orders like-
- Know details of the order
- Reorder the products in the order
- Review the products in the order.

My Downloadable Products
It will display the details of all the downloadable products of the customer with
- Order ID,
- Date,
- Title,
- Status and
- Remaining Downloads,
- along with a button to download the product.

Product Review
It will list up all the reviews made by the customer on different products of the store with the reviews and ratings for the product.

Address Book
It is just like a directory wherein we save all the addresses. Here, we will save the-
- Default addresses of Billing and Shipping.
- List of other addresses.

Thus, from this section, the customer can ‘Add New Address’, edit the present address or delete the addresses.
The customer can click on the button of ‘Add New Address’ to open a form asking the details of the address.


Here, the customer has got the location detection facility also wherein the customer can fill the details with the help of GRPS.
Account Information
This section is meant for the app user to save personal information related to the account. For, this section the app user can update-
- Their first and last name,
- Registered mail address for the login purpose, and
- Password linked with the registered account.

Preferences
This section contains the details related to the app-
Website
The app user can select from the website with which the app is connected. This is a default Magento feature wherein the customer can change from multiple websites.
However, in the backend, the admin needs to enter the translation related to each website.

LanguagE
It provides an option for Multiple Store views, that is the feature allows the user to customize the Store View in various languages right from English to Arabic, French, German and many other.

Note- The app also supports the RTL layout for the customer following the languages like Arabic, Hebrew, Persian/Farsi, and many other languages of the same font style.

Currencies
The customer can select the desired currency as per the requirement. The customer can see the change in currency wherever the price of the product is displayed.


Settings
The app user can take control of the apps few basic functionalities likewise-
Notification
The app user can manage the notification from the app. This can be done for various steps in the app-
Thus, the app user can disable or enable –
- all the notification of the app.
- Orders based notifications.
- Offer based notifications.
- The app User can even monitor the notifications for an abandoned cart.
Offline data
The app user can even manage the data appearing in Offline mode. Thus, the app user can enable or disable the following field to do so-
- Track and Show Recently Viewed Products.
- Track and Show Search History.
Thus, the above details can be even cleared from history.

However, there is an additional button to Manage In Device Setting which we direct the user to the app setting on the device.
Others
CMS Pages
You can also find a link as “CMS Pages” here. Where you can see all the CMS Pages that was created by the admin.
They can be anything like- Privacy policy, About Us page, page and other such pages.


Compare Product
The products can be added to the compare product section from the product page wherein the customer can compare multiple products on the store.
Thus, allowing them to finalize a product from multiple options.

Contact Us
The customer can communicate with the store owner or admin by sharing a message from this section.
Thus helping the customer to build a strong relationship with the store owner.

Cart And Checkout
The Product added to the cart can be seen by clicking on the Cart button present on the homepage. The cart here is just similar to the shopping trolley which is present in the physical store.


Then the app user can easily complete the checkout process in a few steps.
Thus, the customer can select the shipping method for the order. After which the customer can simply review the order detail and select the payment method.


Finally, post-payment the user can click on Place Order for successful order generation at the store end.

Add Review For Delivery Boy
After the completion of the order, the customer can add the review as per the delivery experience. For this, the customer can simply view the order in the mobile application and follow the below process:


AR Product
Firstly, apart from the default Magento(Adobe Commerce) product, the app supports an additional product type which is AR.

Furthermore, the app user can click on the AR icon to detect the surface of the product to analyze the product in reality.


Manage Walk Through
Firstly, the admin needs to add the walk-through version from the configuration by navigating to Stores > Configuration > Walk Through Settings.

The admin can manage the walkthrough configuration by navigating to the Mobikul > Manage Walk Through. There the list of walk through will be visible as shown in the image below:

The admin can create the new walk through by clicking on the Add Walk Through button available in the top right corner. Further, the admin needs to provide basic details like Walk Through Image, Title, Description, Color code (hexadecimal), Sort Order, and

Moreover, the admin can also edit the previously created walk throughs by clicking its respective edit button present in the list. Further, the page will view as shown in the image below:

Walk Through Mobile App View
The walk-through will look somewhat like the images shown below:


Home Layout Configuration
The admin can set the Home Layout as Layout One and Layout Two as shown in the image below:

Frontend View
Layout One
Layout Two
App Category View
The admin can also manage the category view. Two category views are provided in the demo that is Default Category View and Tab Category View:
Default Category View

Launcher Icon Configuration
The admin can also select the launcher icon. Further, the admin can manage the same from the admin panel:
![]()
There are five types of launcher icons available as in the image below:
One
Two
Three
Four
Five
Dynamic Theme Management
The admin can also manage and configure the frontend appearance of multiple sections of the mobile app from the backend. The configurations that come under these sections are mentioned below.
Light Mode Theme Configuration
The admin can also manage the theme configuration when the mobile phone theme mode is set to light. For this, the admin needs to enter the details like App Button Color, App Theme Color, App Theme Text Color, App Button Text Color, Upload App Logo, and Upload Splash Image.

Frontend View on Light Mode

Dark Mode Theme Configuration
The admin can also manage the theme configuration when the mobile phone theme mode is set to dark. For this, the admin needs to enter the details like App Button Color, App Theme Color, App Theme Text Color, App Button Text Color, Upload App Logo, and Upload Splash Image.

Frontend View on Dark Mode

That’s all for the MOBIKUL still, However, if you still have any issue feel free to add a ticket and let us know your views to make the module better.
Originally published on https://webkul.com/


